2. Editing
2.1. Keyboard Editing
Sublime Text is chock full of editing features. This is a partial list.
Selecting, editing, inserting and overwriting text operates much the same as any Windows (or other GUI) control that allows text editing. Hitting the Insert key toggles between insert and overwrite modes. Whenever text is selected, hitting a any printable key (alphanumeric, symbol, Space or Enter) causes the key to replace whatever is selected.
Navigation keys and mouse clicks and drags operate as expected. Holding down the Shift key while navigating by keyboard or left-clicking the mouse changes the text that is selected. Adding Ctrl to that combination with Left and Right arrow keys causes the selection to expand by whole words for each keystroke. Shift (alone) combined with Up and Down arrow keys causes the selection to expand by whole lines.
All of the above is behavior common to most GUI text editing since Windows 3 (1992).
Common to many editors, Ctrl + Up or Down causes the View to scroll without moving the selection(s).
Not common to many editors, Ctrl-Shift + Up or Down actually moves (drags) the selected text in the indicated direction. If no text is selected, the whole line is moved up or down.
2.1.1. Expanding the Selection
Expanding your selection is one of the many “Power Features” of Sublime Text. Becoming adept with these will save you many keystrokes!
While most editors have a Select All command in their Edit menu,
Sublime Text expands on that by having an entire Selection menu. Here are
the commands it contains, their keyboard shortcuts, and what they mean:
Command                         Key Combo          Command                         Args                     Meaning
Select All                      Ctrl-A             select_all
Expand Section                  Ctrl-Shift-A       expand_selection                {"to": "smart"}          Expand to word, line, then all
Expand Section                  Ctrl-Shift-A       expand_selection                {"to": "tag"}            (in HTML,XML) Expand to tag
Expand Section to Line          Ctrl-L             expand_selection                {"to": "line"}           Expand to current line, then down 1 line
Expand Section to Line Upward   Alt-L              expand_selection                {"to": "line_prev"}      Expand to current line, then up 1 line
Expand Section to Word          Ctrl-D             find_under_expand                                        Expand to word, then matching whole words [1]
Expand Section to Word          Ctrl-K, Ctrl-D     find_under_expand_skip                                   Discard last word matched, jump to next [1]
Expand Section to Block                            expand_selection_to_paragraph                            Expand to block of text, then down 1 block
Expand Section to Paragraph                        expand_selection_to_paragraph   {"markup_aware": true}   Same as block + with markup awareness
Expand Section to Scope         Ctrl-Shift-Space   expand_selection                {"to": "scope"}          Expand to matching scope [2]
Expand Section to Brackets      Ctrl-Shift-M       expand_selection                {"to": "brackets"}       Expand to next wider set of brackets [2] [3]
Expand Section to Indentation                      expand_selection                {"to": "indentation"}    Expand to everything block with leading whitespace
2.1.2. Multiple Selections
Terminology:
caret, a selection when the selection is empty—no text is selected
selection, a section when it is not stated whether any text is selected
There are a variety of ways you can edit with multiple selections. When there are multiple selections in play, every navigation and editing key applies to all selections. Hit Esc to return to 1 selection again (though Esc first closes the visible Overlay and Panel if either is open).
The different ways multiple selections can be created and used are listed below roughly in order of their frequency of use.
2.1.2.1. Arbitrary Positions
Probably the most basic way to create multiple carets is to [Ctrl-Left-Click] with the mouse at each point a new caret (selection) is needed. You can scroll the text with the mouse wheel and/or scroll bar if not all selections fit within the visible window area.
2.1.2.2. Variable or Function Names
Place cursor on a variable name when you want to select several or all occurrences. Ctrl-D to expand selection to full variable name. Ctrl-D again select the next occurrence of that variable name. Ctrl-K, Ctrl-D to skip the currently-selected instance of that variable name (might not apply, e.g. might be same word in a string or comment). If you Ctrl-D farther than you intended, Ctrl-U to de-select most recent match. Once you have all intended occurrences selected, anything you type will be reflected at all occurrences of the selection. This is a great way to change a variable or function name throughout a document, or just within the function that it occurs in. Esc to return to 1 selection again.
2.1.2.3. Columns
When editing needs to occur in more than one place that are in the same columnar position on every line involved, place cursor on the top line in that column, then each time you hit Ctrl-Alt-Down (Alt-Shift-Down on Linux), it will add another selection immediately below the most recent one added. Ctrl-Alt-Up (Alt-Shift-Up on Linux) extends the set of selections upward.
2.1.2.4. Selecting Columns
Keyboard Method:
Once you have done the above, selecting the column’s content is as easy as holding down the Shift key while pressing the Left or Right arrow keys.
Mouse Method:
There is another (in some cases faster) way to select columns by drag-selecting with the middle mouse button. If you drag straight down, you get a column of carets with no text selected.
2.1.2.5. Beginning/End of Line
Make a columnar selection, then hit End to move each caret to the end of its respective line. Hitting the Home key moves all carets to the beginning of their respective lines. If 2 carets are on the same line, either of these steps causes those carets to land at the same location, in which case they are combined into a single caret.
2.1.2.6. Lines and Words
To expand each selection to its full line (including newline at the end): Ctrl-L. Ctrl-Shift-L to de-select the ending newline from each selection. Ctrl-Shift-L again to split each line into words (a selection for each word).
2.1.2.7. Find All (Power Feature)
From several of the Find/Replace panels, there is a [Find All] button. Clicking it (or hitting Alt-Enter) places a selection at every occurrence of that string in the current View, while closing that Find Panel, placing focus in the View again, making it ready for your next editing keystroke.
This can be extremely useful using Regular Expressions. For example, you could search
for all whitespace. Once every occurrence of whitespace was selected (which would
include every newline), hitting enter would convert the entire document into a
column of words. Hitting delete on the other hand would merge all non-whitespace
text into one continuous string. You may find other uses for [Find All] with Regular
Expressions; the only limit is your imagination.
2.1.2.8. Bound Find All (Power Feature)
There is a very special and powerful way to use the Find-All feature within a bound area. This is for use when, say, in a comma-separated list, you would like to have a caret at each comma, but you don’t want to [Ctrl-Left-Click] with the mouse at each one, and you also don’t want to select every comma in the document—just in a particular block of text (e.g. in a table):
Select the text that contains all the commas you want to select;
Ctrl-F to open the Find Panel;
before you do anything else, click to toggle the “In selection” option to the left of the Find textbox (this is the key to making it work);
click the [Find All] button or hit Alt-Enter.
Voilà! You now have a selection containing each comma in your selected text area, and each keystroke and arrow key does the same action at each one. Example:
Right to de-select the commas and place caret on right side of each comma.
Enter to bring list into a vertical column where they can be sorted or other actions applied that are easier to do when they are oriented vertically.
Backspace to delete all the commas.
, to add a comma (at EOL at each caret).
Del to bring the list back into 1 line.
Space to add a space after each comma.
This author uses this feature frequently.
2.1.2.9. Find All from Selected Text (Power Feature)
With text selected (e.g. a unique variable name), Alt-F3 causes a selection to instantly select every occurrence of that name. If you selected a single newline, hitting Alt-F3 would instantly select all newlines in the whole file.
2.1.3. Column Selection
You can select a column of text (e.g. for cut and paste elsewhere) in 2 ways:
Keyboard:
Ctrl-Alt-Up or Ctrl-Alt-Down to add multiple selections in a vertical line. Then Shift-Right or Shift-Left expands the selection to the desired column width.
Mouse (Windows):
Method A: Using the mouse middle button, click and drag.
Method B: Using the mouse right button + Shift, click and drag.
For other platforms, see Column Selection in the Official Documentation.
Tip
If you use this method to “cut” text onto the clipboard to move the column elsewhere, be sure you have the same number of carets when you “paste”.
2.1.5. Bookmarks
The menu offers a nearly full range of bookmark tools. In Sublime Text, Bookmarks provide memory of positions(row and column) that persists until toggled off, cleared, or the View is closed, whichever comes first.(Unfortunately, there is no “Push Bookmark” or “Pop Bookmark”, which functionality is provided by the MarkerStack Package as of January 2026.)
Command                         Key Combo          Command                Args                     Meaning
Toggle Bookmark                 Ctrl-F2            toggle_bookmark        {"toggle_line": true }   Delete Bookmark if there is one on current line, otherwise create one at current position.
Next Bookmark                   F2                 next_bookmark                                   Goto closest Bookmark after current position in View, or wrap to first Bookmark.
Prev Bookmark                   Shift-F2           prev_bookmark                                   Goto closest Bookmark before current position in View, or wrap to last Bookmark.
Clear Bookmarks                 Ctrl-Shift-F2      clear_bookmarks                                 Delete all Bookmarks in View.
Select All Bookmarks            Alt-F2             select_all_bookmarks                            Place an empty selection (caret) at each Bookmark (row and column where set).
2.1.6. Using the Mark
“The Mark” is the subject of the sub-menu, and
appears to be from the Emacs editor “realm”. Commands related to “The Mark” can
also be carried out through certain Ctrl-K ... key sequences. It is probable
that people used to using the Emacs editor probably have learned to “think with it”.
It is probably appropriate for people who like mode-based editors like Emacs,
vi and vim.
Note the command places the deleted
text into a temporary buffer called The Kill Ring, and can be recalled
(pasted) later using (or Ctrl-K Ctrl-Y)
until it gets overwritten by the next ... Delete to Mark operation.
2.1.6.1. The Kill Ring
The Emacs editor has a buffer called the Kill Ring, which is an actual Ring Buffer that gets added to every time a block of text is “killed” (a special way of deleting when you want to retrieve that text later, possibly in a different file). This is probably extremely handy for things like rearranging blocks of text or code. A cursory view of Emacs documentation suggests this Ring Buffer can be treated like a stack (with the “yank” command, pasting the most recent text “killed”), as well as being able to paste selecting the text from a displayed list, similar to Sublime Text’s Paste from History.
As of Sublime Text in build 2027 (19-Feb-2011), the Kill Ring was added,
(likely with the Delete to Mark feature) which the author(s) called a Kill Ring,
separate from the OS’s clipboard, and may actually be quite useful (if
it was documented) and might be similar to the Emacs Kill Ring. I can only tell you
it is likely to be useful to people with Emacs editor experience, and you can learn
more about it by reading its code. You will have to extract it from
<install_path>/Packages/Default.sublime-package
It’s in the root of that Package in kill_ring.py. The Default Package also
includes an “add_to_kill_ring” Command used in several .sublime-macro files in
the Default Package command with a Boolean “forward” argument, whose meaning you can
find out more about in the kill_ring.py file. At a glance, the Kill Ring
appears to be line oriented.
Every time a block of text gets “killed” (in this case “delete to mark”, with Ctrl-K, Ctrl-W), the text block between the caret and the mark (set with Ctrl-K, Ctrl-Space) is removed from the editing Buffer and overwrites whatever text was previously in the Kill Ring.
Note that the Sublime Text operation to delete a whole line (appropriately bound to Ctrl-Shift-K [“K” for “kill”] by default), runs the macro file
Delete Line.sublime-macro
from the Default Package, which adds the deleted line to the Kill Ring—quite a
convenient way to be able to later Ctrl-K, Ctrl-Y to “paste” the
deleted lines without involving the OS’s clipboard.
Sublime Text’s Kill Ring is not the same as the copy history, which does involve the OS’s clipboard. See Paste from History for more details.
2.1.7. Paste from History
Very handy when you just accidentally copied (or cut) text when what was on the clipboard was still valuable, or if you would like to “cut” ( or Ctrl-X) several blocks of text from one part of a document and then paste them all in another part (e.g. rearranging blocks of text or code), Sublime Text remembers what you copied onto the clipboard in a clipboard history list which gets displayed as a pop-up list overlay to select from when you press Ctrl-K, Ctrl-V.
Important: the copy history does not survive across Sublime Text sessions.
2.1.8. MarkerStack
MarkerStack is a package for Sublime Text that enables you to efficiently manage temporary moves away from your current editing position in Sublime Text 4050 and onward by:
pushing a “Marker” (position in text) onto a “Marker Stack”, with
the ability to come back to that point later by popping it off the Marker Stack.
When a Marker is pushed, a symbol appears in the left gutter showing what line it is on. The gutter icon changes to a “multiple Marker” icon when there is more than one Marker on the same line. The marker moves with the text when text is inserted or deleted before it. MarkerStack state is “remembered” until the View is closed, or until all Markers are popped off the stack, whichever comes first.
2.1.8.1. The Problem MarkerStack Solves
There are many kinds of editing interruptions that happen regularly for most people using a text editor. Examples:
go elsewhere in a file to look up something and/or copy it to the clipboard, so that it can be pasted where you are editing;
handle a change required elsewhere in the file before you forget it (e.g. a typo you just found and you know it occurred in several other places);
you get interrupted and need to move your cursor away from where you are editing in order to handle the interruption.
With MarkerStack, you can PUSH your cursor (caret) position in a Sublime Text View with one keystroke, go do something elsewhere in the same file, and then POP your cursor position with another keystroke, to instantly be back where you left off, without having to remember where it is.
Marker Stack data is saved across Sublime Text sessions, for those occasions when handling an interruption might span across Sublime Text sessions.
It is designed for efficiently managing temporary moves away from your current editing position in the text.
For additional details, see the README.md and module header comment in
markerstack.py file in the Package.
2.1.8.2. Why MarkerStack is Better than Bookmarks for Interruptions
Using Sublime Text Bookmarks is a handy way to navigate repeatedly to different places in a file you are working on, but it leaves a gap of functionality that writers, editors and coders sometimes need for temporary moves away from the part of the file being viewed or edited.
Using MarkerStack is significantly more efficient than setting a Bookmark for interruptions such as the above, and doesn’t leave you with the task of
cleaning up unused bookmarks, or
remembering where you were previously in the file.
To illustrate, let’s say you are typing in one paragraph (or block of code) and your train of thought (or a phone call) makes you realize that there is something else in the file that needs to be updated, and you want to do that quickly before you forget, and then come back to continue what you were doing before. You can sort of “manage” that with Bookmarks, but Bookmarks were not designed to handle that scenario efficiently. MarkerStack is.
2.1.9. Spell Checking
Spell checking for any particular file extension can be turned ON or OFF via
settings (). The setting
name is “spell_check”, and the value can be JSON true or false.
The application-level setting () “dictionary” setting governs which dictionary is used to compare words against.
“dictionary”: “Packages/Language - English/en_GB.dic”,
“dictionary”: “Packages/Language - English/en_US.dic”,
use the British English and US English dictionaries respectively. This setting can also be made “per file type” by using .
2.1.10. Bracket-Type Key Behaviors
Certain keys have interesting behavior when the auto_match_enabled setting is
true: ', ", (, [, {.
If you are familiar with the behavior, you can get more done with fewer keystrokes.
When each caret has no text selected, hitting one of these keys causes the matching counterpart to appear to the right. If you then Backspace, it deletes both of them... at each caret.
When each caret has some text selected, hitting any of these keys wraps the selected text in the implied “brackets”.
See the default key bindings and search for “auto_match_enabled” to see everything they can do. (You will need to understand Contexts to understand the meanings if you don’t already.)
This is also a good place to mention that, by default, the Ctrl-M key is mapped
to a command that makes the caret jump from the (, [, { bracket-family
characters to the opposite matching bracket, complete with intelligence built-in
for correctly interpreting nested brackets! Very useful when coding in a programming
language!
2.1.11. Find and Replace
Sublime Text features 5 different kinds of Find/Replace features, 4 of which have their own I/O Panel (like a dialog box at the bottom of the Window). These facilities offer a remarkably flexible way to find and/or replace text in the current file or recursively within a set of files under a particular directory. All the fancy find/replace features that programmers would expect of a programmable programmer’s editor are available:
optional instant highlighting of found text (complete with a sky-blue marker in both gutters on the right for each match found),
optionally constraining the search to selected text,
optionally with “whole words” constraint,
optionally case-sensitive,
optionally using the full set of Perl Regular Expressions (including special modifiers) for both finding AND replacing.
Plus, no matter what type of Find and/or Replace operation you are doing, you can get helpful information (e.g. about how many find results there are and which one of them is being highlighted, etc.) in the status bar.
Here is a list of the Find/Replace features, with their Input Fields, options, buttons and keys involved and what they do. Where a keystroke and a button both do the same action, they are listed on the same line.
Find Ctrl-F (if there is a non-empty selection, that text will be copied to the Find String input panel)
Input Fields:
Find String or Regex (with history drop-down list)
Options:
Regex Alt-R
Case Sensitive Alt-C
Whole Word Alt-W
Wrap
Within Selection
Highlight Matches
Buttons and Equivalent Keys:
[x], Esc (Close Panel)[Find], Enter or F3 (Find Next)[Find Prev], Shift-Enter or Shift-F3 (Find Prev)[Find All]or Alt-Enter (See Power Feature: Find All)
Keys Not Covered Above: (none)
Incremental Find Ctrl-I (selected text is not copied to Find String input) This is like the Find Panel except A) without buttons, and B) without copying selected text to the find input.
Input Fields:
Find String or Regex (with history drop-down list)
Options:
Regex Alt-R
Case Sensitive Alt-C
Whole Word Alt-W
Wrap
Within Selection
Highlight Matches
Buttons and Equivalent Keys:
[x]or Esc (Close Panel)
Keys Not Covered Above:
Enter or F3 (Find Next)
Shift-Enter or Shift-F3 (Find Previous)
Alt-Enter (See Power Feature: Find All)
Replace Ctrl-H (if there is a non-empty selection, that text will be copied to the Find String input panel)
Input Fields:
Find String or Regex (with history drop-down list)
Replace String (with history drop-down list) (can include backreferences to Find String if it was a Regex)
Options:
Regex Alt-R
Case Sensitive Alt-C
Whole Word Alt-W
Preserve Case Alt-A (applies to replace string)
Wrap
Within Selection
Highlight Matches
Buttons and Equivalent Keys:
[x]or Esc (Close Panel)[Find], Enter or F3[Replace]or Ctrl-Shift-H[Find All]or - (See Power Feature: Find All)[Replace All]or Ctrl-Alt-Enter (instantly replace all instances in current View Buffer and close Replace Panel)
Keys Not Covered Above:
Shift-Enter or Shift-F3 (Find Previous)
Find-in-Files Ctrl-Shift-F (if there is a non-empty selection, that string will be copied to the Find String input panel)
Input Fields:
Find String or Regex (with history drop-down list)
Where (comma-separated list of specifiers, edit with
[...]button)path to top folder to search recursively in native path format
include filters (e.g.
*.txt, e.g.C:\path\to\folder,*.txt)exclude filters (like include filters but prefixed with a hyphen)
<project filters>(meaning these optional lists from within the currently-open project along with their meanings:“path”: “C:pathtoprojectroot”
“file_exclude_patterns”: [file_spec_list]
“folder_exclude_patterns”: [file_spec_list]
<open folders>(only those folders open within the current project)<open files>(only those files already open in a View)<current file>(only current file)
Replace String (with history drop-down list) (can include backreferences to Find String if it was a Regex)
Options:
Regex Alt-R
Case Sensitive Alt-C
Whole Word Alt-W
Use .gitignore (applies to Where string)
Preserve Case Alt-A (applies to Replace string)
Buttons and Equivalent Keys:
[x]or Esc (Close Panel)[Find]or Enter (recursively searches “Where” specification appending results to “Find Results” View, creating one if it doesn’t already exist)[...]next to “Where” Input Panel, partially automates editing of “Where” specification.[Replace]or Ctrl-Alt-Enter (pops up a dialog box with confirmation message like “Find 25 occurrences across 10 files” with[Replace]and[Cancel]buttons; Esc closes dialog box)
Keys Not Covered Above:
F3 (Finds Next in current View)
Shift-F3 (Find Previous in current View)
The direct
Find Alloperation does not have its own panel. See Power Feature: Find All for details.
2.1.11.1. Power Feature: Find All
The plain “Find” Panel (Ctrl-F by default) does all the usual things, and accomplishes
finding in the current View (one single file at a time). But there is something very
powerful and “Sublime-ish” that is worth mentioning: clicking the [Find All]
button literally places a selection with the caret on the right side of each
selection. If you know about this and take advantage of it, it can make some complex
editing tasks a breeze.
While each match is selected, the following keystrokes perform special actions:
Esc exits Find-All Mode, reverting to a single selection.
[<-] or [->] arrow key de-selects each instance placing the caret on the left or right side of each match string respectively, turning all selections into carets.
Del or Backspace deletes each instance, turning all selections into carets.
Any printable key, Enter, or pasting from the clipboard replaces all selections with the entered keystroke or text (
nfor Enter key), turning all selections into carets.
Example:
You are editing a list of words (e.g. a plain-text dictionary list) that has no
line endings in it, so the long list extends out 4, 8 or 16KB to the right all
on line line, and you want to work with it as a vertical list list with one word on
each line. And let’s say you don’t know if any words might have multiple spaces
and/or tabs between them. Using the Regular Expressions feature (you can toggle it
ON and OFF using Alt-R while keyboard focus is in the Find Panel), you
can search for something like \s+ to find all the white space and then click
[Find All], and all of a sudden, you are in the very powerful position of being
able to type any printable character (including Enter) to replace the found
text at EVERY location where it was found! Hit the Enter key, and
voilà—you are now looking at the vertical list you wanted to create! And how many
keystrokes did that take? Let’s count them:
Ctrl-F (to open and place keyboard focus on the Find Panel)
Alt-R (to turn on Regular Expression mode, if it wasn’t already turned on from a previous find operation)
\s+
- (or click the
[Find All]button, which interestingly places keyboard focus back in the editing area again)Enter
Remarkable! 4 keystrokes.
The reverse can be done just as easily! With your vertical list, now try this:
Ctrl-F (note that the Find Panel remains how you left it; note that
\s+also matches\n[newline] characters)- (or click
[Find All])Backspace
Space
Voilà—all the words are now back on line line again! Simultaneously, you also know that exactly 1 space now separates each word.
That same type of operation can be limited to a block of selected text by toggling the “In Selection” mode button (4 buttons to the right of the Regular Expression Mode button).
You may have encountered compact CSS files distributed with web pages, similar to the above, having no line endings). What better way to make them readable for analysis and debugging CSS in web pages?
Once you’ve seen how easy that is, you can extrapolate to discover other things you can do with this powerful feature.
2.1.11.1.1. Find All from Selection
Alternately, you can select a term you want to find and hit Alt-F3 to instantly have all instances of that string selected with the caret on the right side of each selection. (This replaces 6 keystrokes from the Ctrl-F version of Find All.)
2.1.11.2. Regular Expressions
If you are not already acquainted with Regular Expressions, now is a good time to learn them because they provide a very powerful way of finding and replacing text that can save a great deal of editing time when you know what you are doing.
Recommended References for Regular Expressions:
Perl Regular Expression Tutorial (an excellent way to learn Regular Expressions from the ground up [hint: study this in sequence])
Perl Regular Expressions Quick Start (a considerably shorter version of the Tutorial for programmers)
The Definitive Perl Regular Expression Reference (explains EVERYTHING [sometimes more than you need] and is very well written)
Perl Regular Expression Cheat Sheet (excellent way to “brush up” once you have already studied and practiced everything)
Additional References (Which May or May Not Be for Beginners):
Mozilla’s Web Development JavaScript Regular Expression Reference (and all its subordinate pages; this documentation has great cross-references in “See Also” sections at the bottom of each page)
RegexBuddy’s Regex Reference Website which encompasses all “flavors” of Regular Expressions (not just Perl regexes).
Note
While Sublime Text uses the C++ Boost library’s Regular Expression subsystem, which itself is based on the Perl Regular Expression engine, this author does not like to refer others to its documentation at this time (~30-May-2025) because it is quite poor in that it uses terms that it does not define, and is a great way to get very confused.
2.1.11.3. Find in Files, a.k.a. Recursive File Searching
For file searching while doing a recursive “directory walk”, filters of various kinds
can be applied to include or exclude specified folders or file types using the
[...] button.
In the Find-in-Files operation with the [Find] button (or hitting Enter),
Sublime Text outputs what it found into a “Find Results” View, which
itself can be edited, have its sections folded (one per file), and saved to a text
file of your choosing via if you need to keep
the contents for any reason. This “Find Results” View comes with a configurable
amount of context [surrounding lines] at each point where a match was found. In
this View, each instance of the found string (or regex) is highlighted. If you
double-click on the line containing any of these highlights, Sublime Text will
open the relevant file(if it isn’t already opened) and place your cursor on the line
where the match was found.
If you use the “Find Results” list as a checklist, for example, in manually editing certain files in your project, you can either code-fold or delete the parts of the list which you have already handled. This is remarkably convenient for making sure you don’t miss anything, and you won’t be prompted to save the file when you close the View.
2.1.11.3.1. Accumulative Find Results
Over and above the ability to use the “Find Results” View as a checklist, if you
leave the “Find Results” View open, and do another Find-in-Files [Find]
operation, the new results are appended to the end of the “Find Results” contents
in a well-labelled manner. This makes it a great way to accumulate Find Results
if/when you need to. Such an accumulated list might serve as a checklist for a task
later on.
While the “Find Results” View is open, the “Next Result” and “Previous Result” commands can be applied (mapped to the F4 and Shift-F4 keys respectively, by default). Using these commands opens the applicable file and places your cursor on the applicable line, in the sequence they appear in the “Find Results” View.
2.1.11.3.2. Find-in-Files Replace Operation
If you click the [Replace] button in the Find-in-Files Panel, you will get a
confirmation dialog box that says something like: “Replace 2 occurrences across 2
files?” with a [Replace] and [Cancel] button. If you click [Replace], then the
occurrences found will be replaced, and the Views showing those files will be left
open and unsaved for you to view and confirm the changes before the Views overwrite
their counterparts on disk.
If you haven’t mapped the save_all command to a Key Binding yet, when
you feel it is safe to do so, you can save all the unsaved files at once using
.
2.1.11.4. Leaving the Find Panel Open
Leaving the Find Panel open also causes found-string highlighting in the editing area to remain active. This can be helpful if you are using the highlighted text to make certain things more visible while you are editing. This can also be useful if you need to make a different type of edit at each location where that string is found.
2.1.11.5. After the Find Panel Has Closed
After the Find Panel has closed, the “Find string” is still silently active, but the highlighting isn’t. However, any time you hit F3 or Shift-F3, it will do a Find-Next or Find-Previous operation from your current cursor location.
2.1.12. Side-by-Side Editing
There are 2 very different ways of editing 2 files side by side. One is considered “more temporary” than the other, which will be covered here. The “less temporary” version of side-by-side editing is covered in Layouts below.
2.1.12.1. Two Views on Same File
To quickly open an additional View into the same file, place focus on the file
whose View you want to split and and .
Alternately, you can right click on the View’s Tab and select Split View.
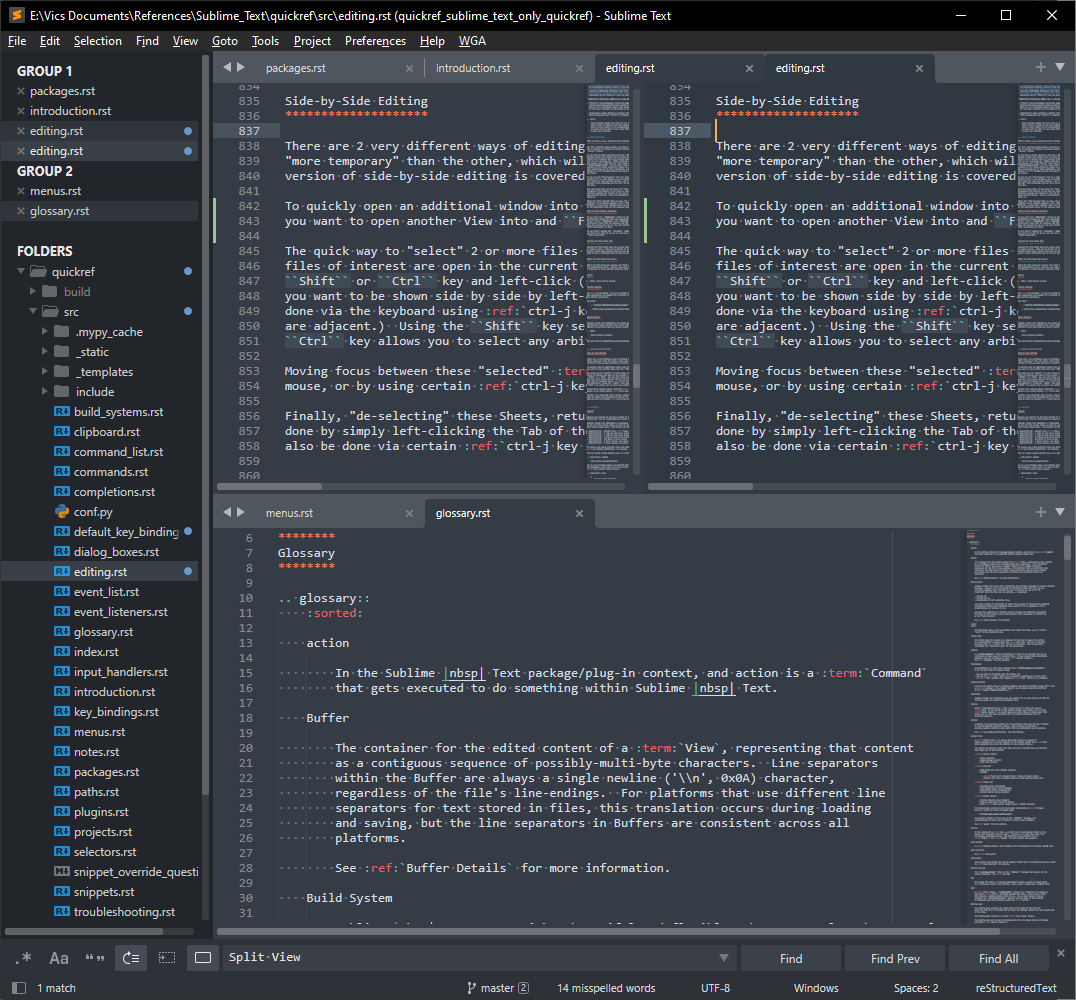
Fig. 2.1.12.1 Split View on Same File
If you wish to position the 2 Views one above the other, you can do so by having 2 active View Groups (a.k.a. “panes”) one above the other. If you don’t already this Window Layout set up, you can do so by changing the Layout using or Alt-Shift-8 if that key still has its mapping from the Default Key Map. (This is covered in more detail in Layouts below.) Once the 2nd View Group is available, you can use your mouse to simply drag the 2nd View to the 2nd View Group.
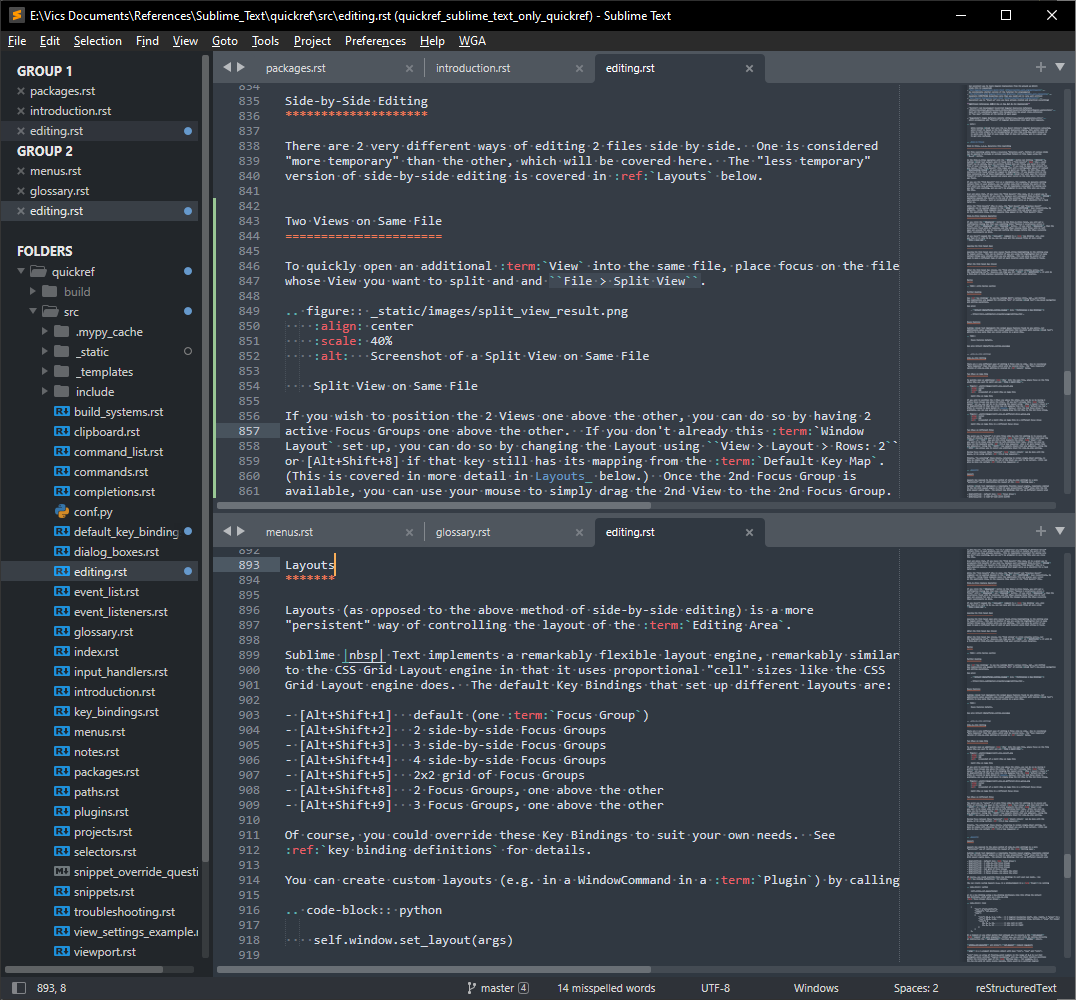
Fig. 2.1.12.2 Split View on Same File in a Different View Group
This can be quite handy, for example, to show the design of an algorithm in one View Group (pane) while editing its code in another.
2.1.12.1.1. Keyboard Shortcut
Split the View: Alt-F, Alt-E
De-select one of the 2 views: Ctrl-J, Ctrl-Left
Create a new View Group with current View: Ctrl-K, Ctrl-Up
Select Window Layout with 2 rows: Alt-Shift-8
2.1.12.2. Two Views on Different Files
The quick way to “select” 2 or more files side by side for editing is to ensure all files of interest are open in the current View Group, and then hold down the Shift or Ctrl key and left-click (select) the other Tab you want to be shown side by side by left-clicking their Tabs. (This can also be done via the keyboard using Leading Key: Ctrl-J when 2 or more target tabs are adjacent.) Using the Shift key selects Tabs that are adjacent. Using the Ctrl key allows you to select any arbitrary Tab for side-by-side editing.
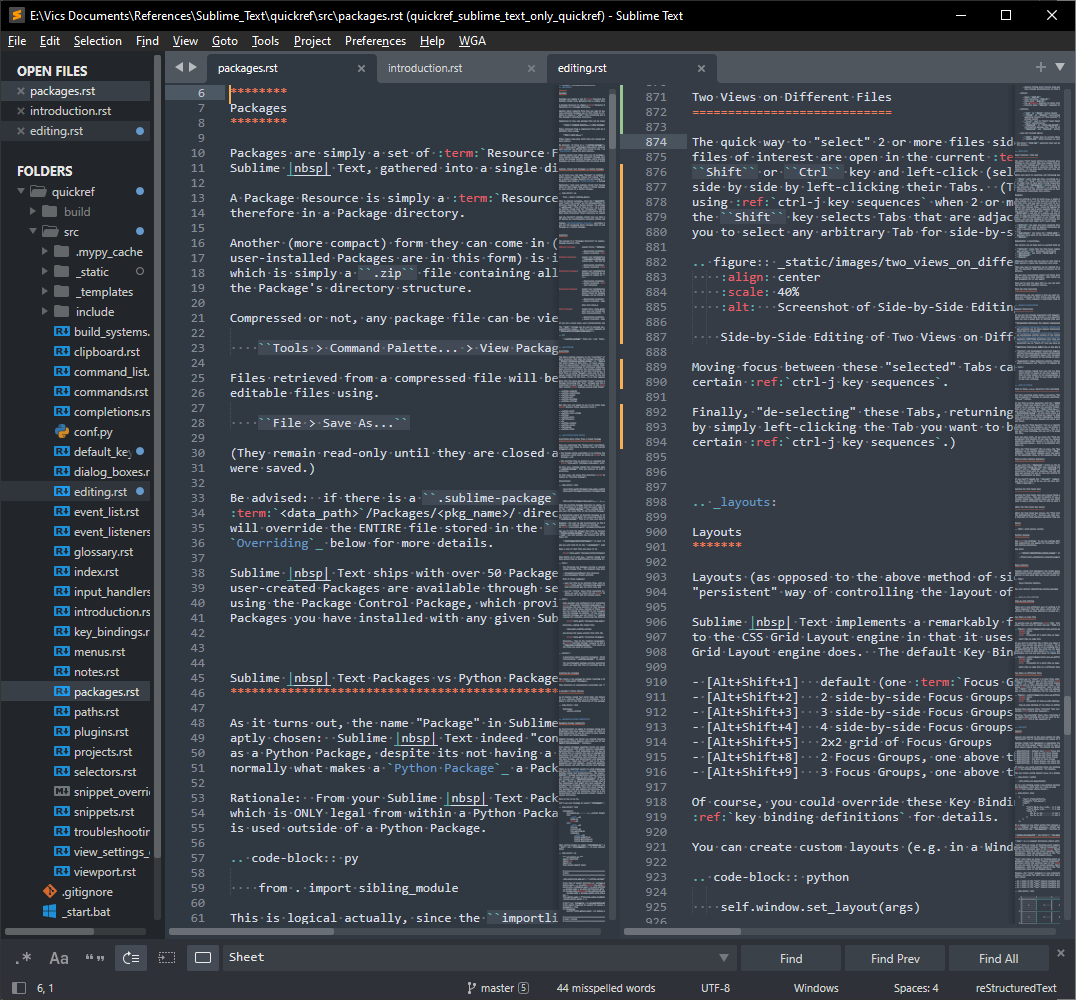
Fig. 2.1.12.3 Side-by-Side Editing of Two Views on Different Files
Moving focus between these “selected” Tabs can be done with the mouse, or by using certain Leading Key: Ctrl-J.
Finally, “de-selecting” these Tabs, returning to normal single-View editing, is done by simply left-clicking the Tab you want to be current. (This can also be done via certain Leading Key: Ctrl-J.)
Sublime Text documentation calls this Tab Multi-Select. Different ways to navigate using this feature are quite elaborate and covered on that web page. The end of that page also contains a list of API features that allow working with and navigating with Multi-Selected Tabs from within a Plugin.
2.1.13. Layouts
Layouts (as opposed to the above method of side-by-side editing) is a more “persistent” way of controlling the layout of the Editing Area.
Sublime Text implements a remarkably flexible layout engine, remarkably similar to the CSS Grid Layout engine in that it uses proportional “cell” sizes like the CSS Grid Layout engine does. The default Key Bindings that set up different layouts are:
Alt-Shift-1 default (one View Group)
Alt-Shift-2 2 side-by-side View Groups
Alt-Shift-3 3 side-by-side View Groups
Alt-Shift-4 4 side-by-side View Groups
Alt-Shift-5 2x2 grid of View Groups
Alt-Shift-8 2 View Groups, one above the other
Alt-Shift-9 3 View Groups, one above the other
Of course, you could override these Key Bindings to suit your own needs. See Key-Binding Definitions for details.
You can create custom layouts (e.g. in a WindowCommand in a Plugin) by calling
self.window.set_layout(args)
or in a Key Binding using a Key-Binding dictionary like this (from the default Key Bindings), which sets up 2 side-by-side View Groups.
{
    "keys": ["alt+shift+2"],
    "command": "set_layout",
    "args":
    {
        "cols": [0.0, 0.5, 1.0],   // 3 logical boundaries (left, mid, right), 2 "areas" for width
        "rows": [0.0, 1.0],        // 2 logical boundaries (top, bottom), 1 "area" for height
        "cells": [
            [0, 0, 1, 1],          // one cell on left
            [1, 0, 2, 1]           // one cell on right
        ]
    }
},
Or a Command or any other method that allowed you to execute a the set_layout
Command and pass arguments. Either way, you will still be calling (directly
or indirectly) the set_layout() function on the relevant Window object.
2.1.13.1. window.set_layout() and Window’s set_layout Command Arguments
args is a 3-element dictionary object with keys “cols”, “rows” and “cells”.
“cols” takes an array of floating-point numbers in the range of 0.0 to 1.0 that designate where vertical “logical boundaries” will go, and their relative positions within the horizontal span of the Editing Area. For example, in a tic-tac-toe grid (9 cells evenly spaced), there would be 4 vertical logical boundaries. Note the values passed in the “cols” array are the “X” component of the coordinates shown in the diagram below.
“rows” also takes an array of floating-point numbers in the range of 0.0 to 1.0 that designate where horizontal “logical boundaries” will go, and their relative positions within the vertical span of the Editing Area. Using the same tic-tac-toe grid (9 cells evenly spaced), there would be 4 horizontal logical boundaries. Note the values passed in the “cols” array are the “Y” component of the coordinates shown in the diagram below.
Finally, the “cells” argument is very interesting: it contains an array of integer arrays, one array for each cell, and each sub-array is the [x1, y1, x2, y2] of one cell where:
x1 = index of the “cols” logical boundary array that will be that cell’s left edge
y1 = index of the “rows” logical boundary array that will be that cell’s top edge
x2 = index of the “cols” logical boundary array that will be that cell’s right edge
y2 = index of the “rows” logical boundary array that will be that cell’s bottom edge
  0               1               2               3    <-- "cols" indices for vertical
0 #===============+===============+===============#     \     logical boundaries
  #               |               |               #      \
  #               |               |               #       \
  #       1       |       2       |       3       #        \
  #               |               |               #         \
  #               |               |               #          |
1 #---------------+---------------+---------------#          |
  #               |               |               #          |
  #               |               |               #          |
  #       4       |       5       |       6       #           > Editing Area
  #               |               |               #          |
  #               |               |               #          |
2 #---------------+---------------+---------------#          |
  #               |               |               #          |
  #               |               |               #         /
  #       7       |       8       |       9       #        /
  #               |               |               #       /
  #               |               |               #      /
3 #===============+===============+===============#     /
^ ^               ^               ^               ^
| |               |               |               |
| |               |               |               +-- 4th logical boundary
| |               |               +-- 3rd logical boundary
| |               +-- 2nd logical boundary
| +-- 1st logical boundary
+-- "rows" indices for horizontal logical boundaries
Example that accomplishes the above layout with 9 equal-sized cells:
{
    "cols": [0.0, 0.33, 0.66, 1.0],
    "rows": [0.0, 0.33, 0.66, 1.0],
    "cells": [
        [0, 0, 1, 1],  // Cell 1
        [1, 0, 2, 1],  // Cell 2
        [2, 0, 3, 1],  // Cell 3
        [0, 1, 1, 2],  // Cell 4
        [1, 1, 2, 2],  // Cell 5
        [2, 1, 3, 2],  // Cell 6
        [0, 2, 1, 3],  // Cell 7
        [1, 2, 2, 3],  // Cell 8
        [2, 2, 3, 3],  // Cell 9
    ],
}
Note that given those “cols” and “rows” arrays, there doesn’t have to be 9 cells! You could lay out the cells like this:
  0               1               2               3    <-- "cols" indices for vertical
0 #===============+===============+===============#     \    logical boundaries
  #               |               |               #      \
  #               |               |               #       \
  #       1       |       2       |       3       #        \
  #               |               |               #         \
  #               |               |               #          |
1 #---------------+---------------+---------------#          |
  #                               |               #          |
  #                               |               #          |
  #                               |       5       #           > Editing Area
  #                               |               #          |
  #                               |               #          |
2 #               4               +---------------#          |
  #                               |               #          |
  #                               |               #         /
  #                               |       6       #        /
  #                               |               #       /
  #                               |               #      /
3 #===============+===============+===============#     /
^ ^               ^               ^               ^
| |               |               |               |
| |               |               |               +-- 4th vertical logical boundary
| |               |               +-- 3rd vertical logical boundary
| |               +-- 2nd vertical logical boundary
| +-- 1st vertical logical boundary
+-- "rows" indices for horizontal logical boundaries
with:
{
    "cols": [0.0, 0.33, 0.66, 1.0],
    "rows": [0.0, 0.33, 0.66, 1.0],
    "cells": [
        [0, 0, 1, 1],  // Cell 1
        [1, 0, 2, 1],  // Cell 2
        [2, 0, 3, 1],  // Cell 3
        [0, 1, 2, 3],  // Cell 4
        [2, 1, 3, 2],  // Cell 5
        [2, 2, 3, 3],  // Cell 6
    ],
}
You could use whatever proportions you wanted by changing the logical boundary-positions in the “cols” and “rows” arrays.
You could lay out your View Groups like this:
         (0,0)                          (1,0)                           (2,0)
 (0.0)+    +-------------------------------+-------------------------------+
      |    |                               |                               |
      |    |                               |                               |
      |    |                               |                2              |
      |    |                               |                               |
      v    |                             (1,1)                           (2,1)
(0.25)+    |                               +-------------------------------+
      |    |                               |                               |
      |    |               1               |                               |
      |    |                               |                               |
      |    |                               |                               |
      |    |                               |                               |
      |    |                               |                               |
      |    |                               |                4              |
      |    |                               |                               |
      |    |                               |                               |
      | (0,2)                            (1,2)                             |
      v    +-------------------------------+                               |
(0.75)+    |                               |                               |
      |    |                               |                               |
      |    |               3               |                               |
      |    |                               |                               |
      |  (0,3)                           (1,3)                           (2,3)
 (1.0)v    +-------------------------------+-------------------------------+
Using this code in a WindowCommand in a Plugin:
self.window.set_layout({
    "cols": [0.0, 0.5, 1.0],
    "rows": [0.0, 0.25, 0.75, 1.0],
    "cells": [
            [0, 0, 1, 2],  // Cell 1
            [1, 0, 2, 1],  // Cell 2
            [0, 2, 1, 3],  // Cell 3
            [1, 1, 2, 3]   // Cell 4
        ]
    })
Needless to say, it is as flexible as the CSS Grid-Layout engine.
Each cell will receive 1 View Group, each of which can display/edit multiple documents. (Remember, each sheet can also show an image or a miniHTML page as well. So the above could be a convenient layout for showing 2 images, raw HTML, and a “view” of what the HTML will look like when rendered).
2.1.14. Multi-Window Editing
Power Users with multiple monitors sometimes wish to use more than one monitor to edit, and/or display one document in one monitor as a reference while writing source code in another window. There are many ways to do this:
2.1.15. Macros
Sublime Text Macros is a feature that enables you to record and play back keyboard activity that involves only editing commands. (Mouse activity, Window- and Application Commands are not recorded in macros at the time of this writing.)
Begin recording a Macro by hitting Ctrl-Q. Perform the editing task you wish to be recorded, then hit Ctrl-Q to finish the recording. (Whether you started or stopped recording is visible for 4 seconds in the Status Bar.) Now you can play it back any number of times by hitting Ctrl-Shift-Q until your Sublime Text session is closed. Recording a new Macro overwrites the old one. (See Macro Files for a way to save a Macro into a file and replay it again later.)
Previous versions of Sublime Text (e.g. v1.x) appear to have supported dealing with
macros programmatically (via Plugins), but in version 4.x, these features appear to
have been removed, probably for security reasons. However, one method remains and
gets a Python representation of the Macro that has been recorded, if any, or an empty
list if no macro has been recorded yet during the current Sublime Text
session.
my_macro_command_list = sublime.get_macro()
2.1.15.1. Macro Files
If you want to be able to play back a recorded Macro after another Macro has been recorded, or in a future Sublime Text session, you can do so by saving it to a file (while it is current) via .
Macro files are JSONC format files with the extension
.sublime-macro containing a list of Command objects. Sublime Text ships
with a few macros providing some core functionality, such as line and word
operations. You can find them under or in
the Default.sublime.package file. Here is an example—the “Add Line” macro from
the Default Package:
[
    {"command": "move_to", "args": {"to": "hardeol"}},
    {"command": "insert", "args": {"characters": "\n"}}
]
Once the Macro is in a file you can make use of it again in a number of ways. Here are a few:
Hand edit it. You can add or remove commands or adjust existing ones if it was not recorded exactly per your needs.
If it was saved into an unpacked Package directory (e.g. in your
UserPackage), you can:translate it to a Python list of Command (dict) objects via
my_macro = sublime.load_resource('Packages/<pkg_name>/<file_name>')
You can find all replay-able macros via
macro_path_list = sublime.find_resources('*.sublime-macro')
You can replay it anywhere Commands are used. Example using a key binding (e.g.
User/Default (Windows).sublime-keymap):{ "keys": ["alt+a"], "command": "run_macro_file", "args": { "file": "res://Packages/User/Example.sublime-macro" } }
Example in a Plugin:
args = {'file': 'res://Packages/User/Example.sublime-macro'}

# Replay Macro in whatever View is attached to ``view``.
view.run_command('run_macro_file', args)

# Replay Macro in View that has focus in whatever Window ``window`` is attached to.
window.run_command('run_macro_file', args)

# This has no effect.
sublime.run_command('run_macro_file', args)
From a Plugin or in the Console, you can get a Python representation of a recorded Macro by calling
my_macro = sublime.get_macro()
If it was not saved into an unpacked Package directory, you can access it as a file from a Plugin, and interpret its contents via Python mechanisms to translate text into Python objects.
Caution
Please take appropriate security precautions if you are loading and doing things with files whose content may have been provided by someone else.
Note
At this writing there is no known way to cause a Macro stored as a file to become reloaded again into Sublime Text for manual replay via Ctrl-Shift-Q, and thus the above methods of reuse do not replace the currently-recorded macro. The work-around for this is to bind a key to your desired Macro file (or some other method of executing the “run_macro_file” Command), and you can thereafter replay it any time it is needed.
2.1.16. Further Reading
See Default Key Bindings to see how Sublime Edit’s various Ctrl, Alt, and Shift key combinations are mapped for virtually all of Sublime Text’s key-based navigation and editing operations.
See also:
Default ($platform).sublime-keymap(via )
2.2. Editing with the Mouse
Sublime Text implements the normal mouse features found in any editor, but additionally makes possible some clever additions that dovetail with Sublime Text’s ability to have more than one cursor active in a given View.
2.2.1. Mouse Features Covered Above
2.2.2. Mouse Features Not Covered Above
Todo
Mouse Features details.
See also
Default ($platform).sublime-mousemap
2.3. File Diffing
Todo
fill in