As Dr.Explain analyzes the area you have targeted for capture, it compares each object found to the sequence of Win32 screen-capture rules found in
Project Settings > Screen capturing > Capture scenario > Edit > Win32 windows capturing
The first rule that "matches" the object gets used to label the callout. If no rules match, a callout is produced anyway and gets named "Custom Control".
If Dr.Explain analyzes your window and the callouts are not turning out like you want them, you can modify its behavior by creating new rules or editing existing ones.
But what do you put in a new rule? Glad you asked!
First, you need to understand something very basic about the Windows operating system. One of its fundamental features that is rarely well understood is that what it displays on the screen is simply a "tree structure" of windows. If you look carefully, the top of the "tree" is the desktop. The desktop has icons and a task bar (usually at the bottom). Each of these are "child" windows and their "parent" window is the "desktop". Inside that task bar are other windows. The Start button from Windows XP is such an example. It is a "child" window of the task bar, and its "parent" is the task bar window. Then when you launch an application, that application has a main window that is a "child" of the "desktop" window. Inside that window are smaller windows that comprise buttons, menus, toolbars, status bars, documents, etc. etc. Bottom line: this is simply a big window tree structure that Windows uses to draw the screen. This structure helps Windows keep track of which "window" is "on top of" which other window, which windows are visible, etc. etc..
What Dr.Explain does when doing a screen capture is it uses your mouse to determine which "window" you are pointing at, and when it is highlighting what you want to capture, then you do a click or key combination to execute the capture. The "window" (rectangle) you indicated usually has "child" windows in it (including controls), and it is these child windows that are what is examined once the screen capture process is started.
What makes most windows unique and thus identifiable in this context are 4 features:
1. its CLASS (this is simply a name that groups that window with other windows of the same type);
2. its CAPTION if any (this is often text that is displayed by that window, e.g. the name on a button);
3. its STYLE, which is a bit field inside a 32-bit integer;
4. its EXTENDED STYLE, a bit field inside another 32-bit integer.
These features are the elements a Win32 capture rule uses to identify the type of control it is examining, and make an appropriately-named callout for it. In each such rule, all 4 of the above are optional, and so we have ultimate flexibility. We could add a rule at the end of the list that has all 4 of these set to match "any value" and call it "Custom Control", which would catch all objects that weren't matched by some other rule, but Dr.Explain already does this for us, if no rules match.
Each rule, containing 1, 2, 3 or all 4 of the above, tells Dr.Explain that IF THIS RULES MATCHES THE OBJECT CURRENTLY BEING EXAMINED then this rule determines the NAME for that callout according to the rule's "Control title:" value.
So how do we tell Dr.Explain (via these rules) what to match against? Again: glad you asked!
Our next step is to determine just that.
How to do this is to launch the program that Microsoft produced that allows you to display and navigate this window tree structure. It is called Spy++, which comes with the full edition of Microsoft Visual Studio. If you develop low-level Windows applications that communicate with the user interface of other applications, you need this program not only to see the data structure that Windows uses to track them, but to discover things as we are about to do. In this case, we are going to use it to discover the CLASS, CAPTION, STYLE and possibly the EXTENDED STYLE we want to match against, so we can specify our rule.
To do this, we have to actually FIND the "window" that I captured in the above screen capture. So I launch the HM GP Shifter Configuration Tool, which is the program we are documenting, and launch Spy++. (Note that if Spy++ was running first, you have to tell it to "refresh" in order to have an updated "snapshot" of the "window tree".)
Spy++ can help a great deal in finding this window (necessary because there are literally thousands of such windows in the tree). How I did this in Spy++:
1. Ensure both the target application and Spy++ are launched.
2. In Spy++, click Refresh to ensure it has a current snapshot of the window tree. Simultaneously this places your cursor at the top of the tree. This is important because the search feature we are about to use only searches DOWN in the tree.
3. Click the "binoculars" tool-bar button to find a window in the tree.
4. Bring HM GP Shifter Configuration Tool to the front and lower-left of my screen.
5. Move Spy++ window to the upper right so that the "Real-Time Data" area I wanted to find in the tree is exposed.
6. In Spy++ click and drag the "Finder tool" to the HM GP Shifter Configuration Tool's "Real-Time Data" panel such that it highlights the same rectangle that Dr.Explain captured, and release the mouse.
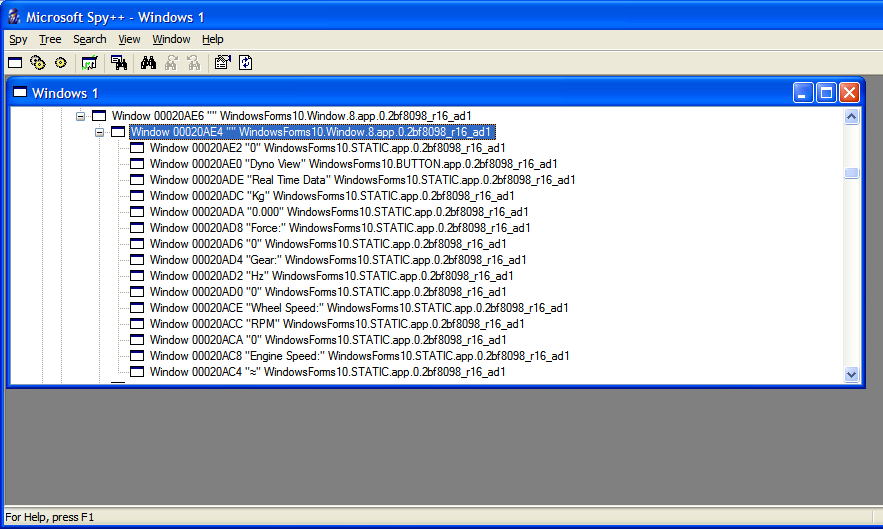
7. Click OK in the FIND dialog and Spy++ goes to my Real-Time Data "window" in the window tree. It looks like this:
Spy++ Window Tree Structure After Finding Real-Time Data Window
As you can see, the immediate "children" of that window contain captions like "0", "Dyno View", "Real Time Data", "Kg", "0.000". These are the labels on that panel in the application. I then went to the first one with caption "0" since this will be a typical example of what I want Dr.Explain to produce callouts for. I right click the tree node in Spy++ and select Properties... and voila!
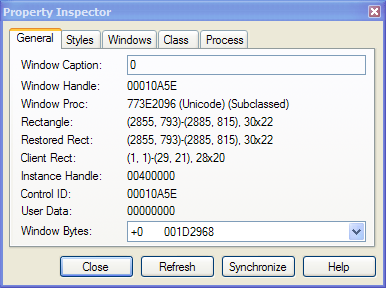
Spy++ Window Properties Inspector Dialog, Showing Class Tab
Spy++ Window Properties Inspector Dialog, Showing General Tab
CLASS: "WindowsForms10.STATIC.app.0.2bf8098_r20_ad1"
This is a .NET class name. Yukk!
Oh well, it's just a name. One key element in there
is the word "STATIC", which matches the old fashioned
Win32 class name for a label. And I can tell Dr.Explain to
match anything that CONTAINS the characters I specify. Great!
I will use "STATIC". In fact, to be more precise (because
I don't want it to override rules already in Dr.Explain)
I will use "WindowsForms10.STATIC", and tell Dr.Explain to use
the "Class name must contain" match criterion.
CAPTION: "0" (just the 0, not including the quotation marks)
These two are enough to identify our control. So we leave the STYLE and EXTENDED STYLE criteria at their default values (Any Style).
Finally, I specify Control title as "My Label" -- this will remind me to replace that text with something more appropriate in my help file.
The last STATIC-class rule is a "catch-all" rule, for any control with "STATIC" in the name, so I place my rule immediately above that, because Dr.Explain processes the rules in a top-to-bottom sequence. We want our new rule to match JUST BEFORE the catch-all rule, or else the catch-all rule will match it instead.
Then when you do your screen capture, make sure the rectangle highlighting the area you are capturing is indeed the color for Win32 screen captures, and Dr.Explain faithfully executes your new rule set.
I made a different rule in my own custom Win32 rules and put it at the top of the STATIC-class list:
Class must contain: WindowsForms10.STATIC
Any caption
Any Style
Any ExStyle
Control title: {Caption} Label
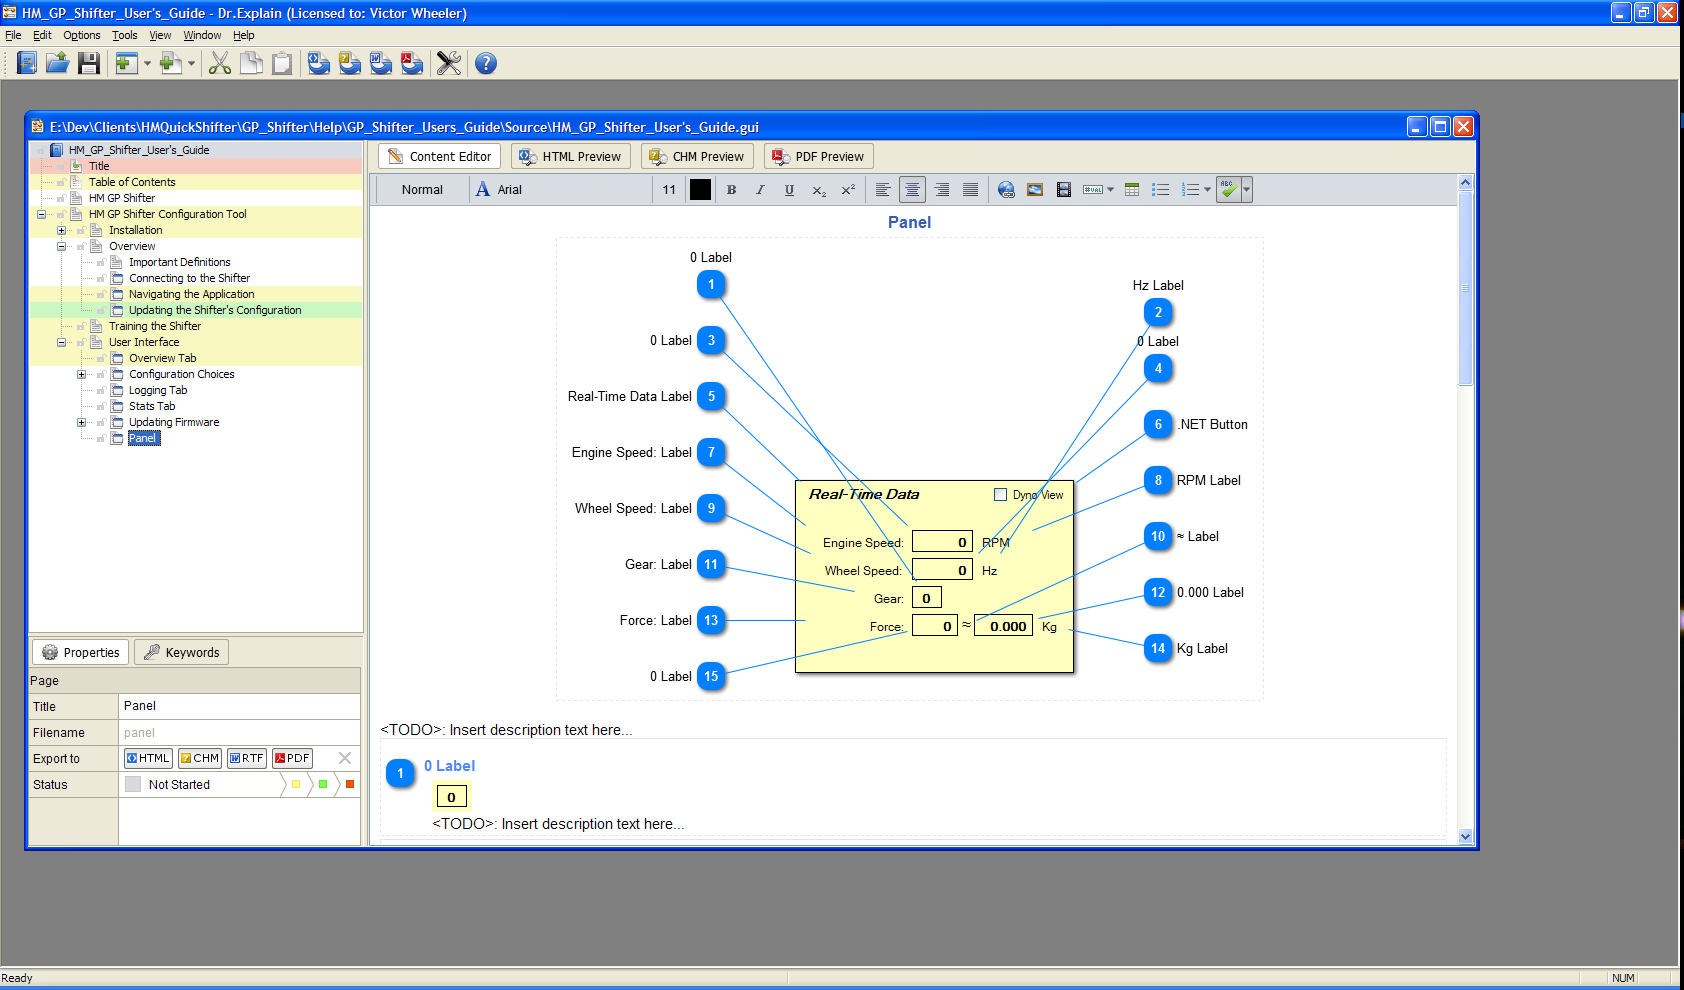
and this is the result of analyzing that same panel we were working with earlier:
Re-Analysis of Real-Time Data Window Using Customized Win32 Analysis Rules
Note that the "Dyno View Checkbox" is labeled ".NET Button". Prior to my making a custom rule for it, it was being labeled "Dyno View Button". This is because the "HM GP Shifter Configuration Tool" application was written using the Windows.Forms library of the .NET library, and a checkbox from that library cannot be differentiated from a regular push-button control using only CLASS, CAPTION and STYLES. With only these criteria to work with, the two appear identical. I so made it label it ".NET Button" so as to remind me change it to something more appropriate. In this case, I will label it "Dyno View Checkbox".